Wednesday, November 21, 2012

Thanksgiving Decor and Tablesettings.

In honor of Thanksgiving I am sharing these projects I made last month at a class. They were inspired by a project I saw at Stampin' Up!'s convention this summer. I changed some things up to make my own version.
 I made a complete set: a candle with leaves to spread out on your table, table settings and a card in case you were celebrating Thanksgiving at someone else's house and might use it as a hostess gift.
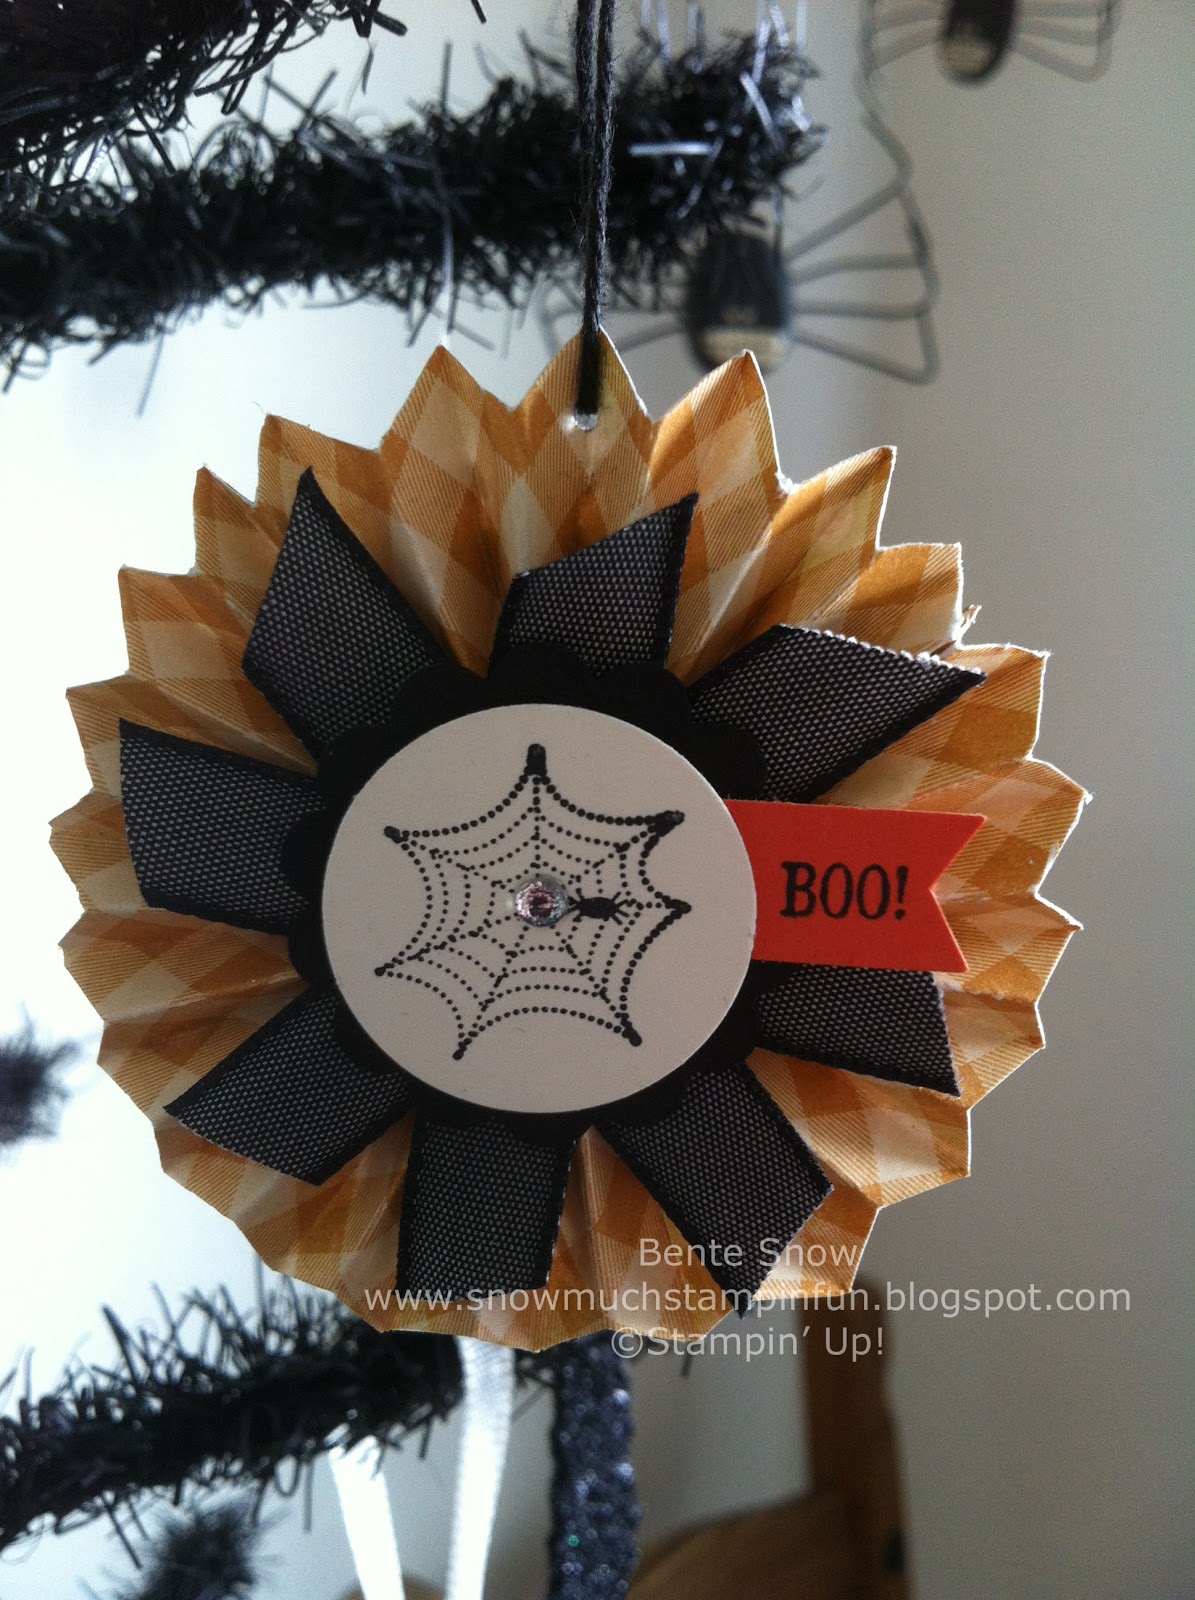
I used a pillar candle from a major craftstore and stamp directly on it by rolling it on my stamp En Francais inked in Black Stazon ink ...it dries instantly and because of the candle wax looks like a silvery gray. I then sponged Champagne Glimmer paint on the candle... it will need to dry for a while before you can attach the decoration. The decoration is leaves cut out with the Autumn Accents die and the Big Shot. I used Champagne Glimmer paper, Very Vanilla, Cajun Craze, More Mustard and Lucky Limeade Card stock. Some of the solid leaves are embossed with the Woodgrain Embossing folder for added texture. All the leaves are crumpled up then sponges with the Champagne Shimmer Paint. The stamped leaves on the candle are stamped with Lucky Limeade and More Mustard ink on Very Vanilla Card stock with the Wonderfall stampset. They are then crumpled up and I used the Cajun Craze ink pad to add the red tips and then used the Champagne Shimmer Paint for lots of shine. The button is from the Designer Buttons naturals - love love love those and I used Linen Thread for the bow. The leaves are clustered together with Glue Dots and attached to the candle with Sticky Tape.

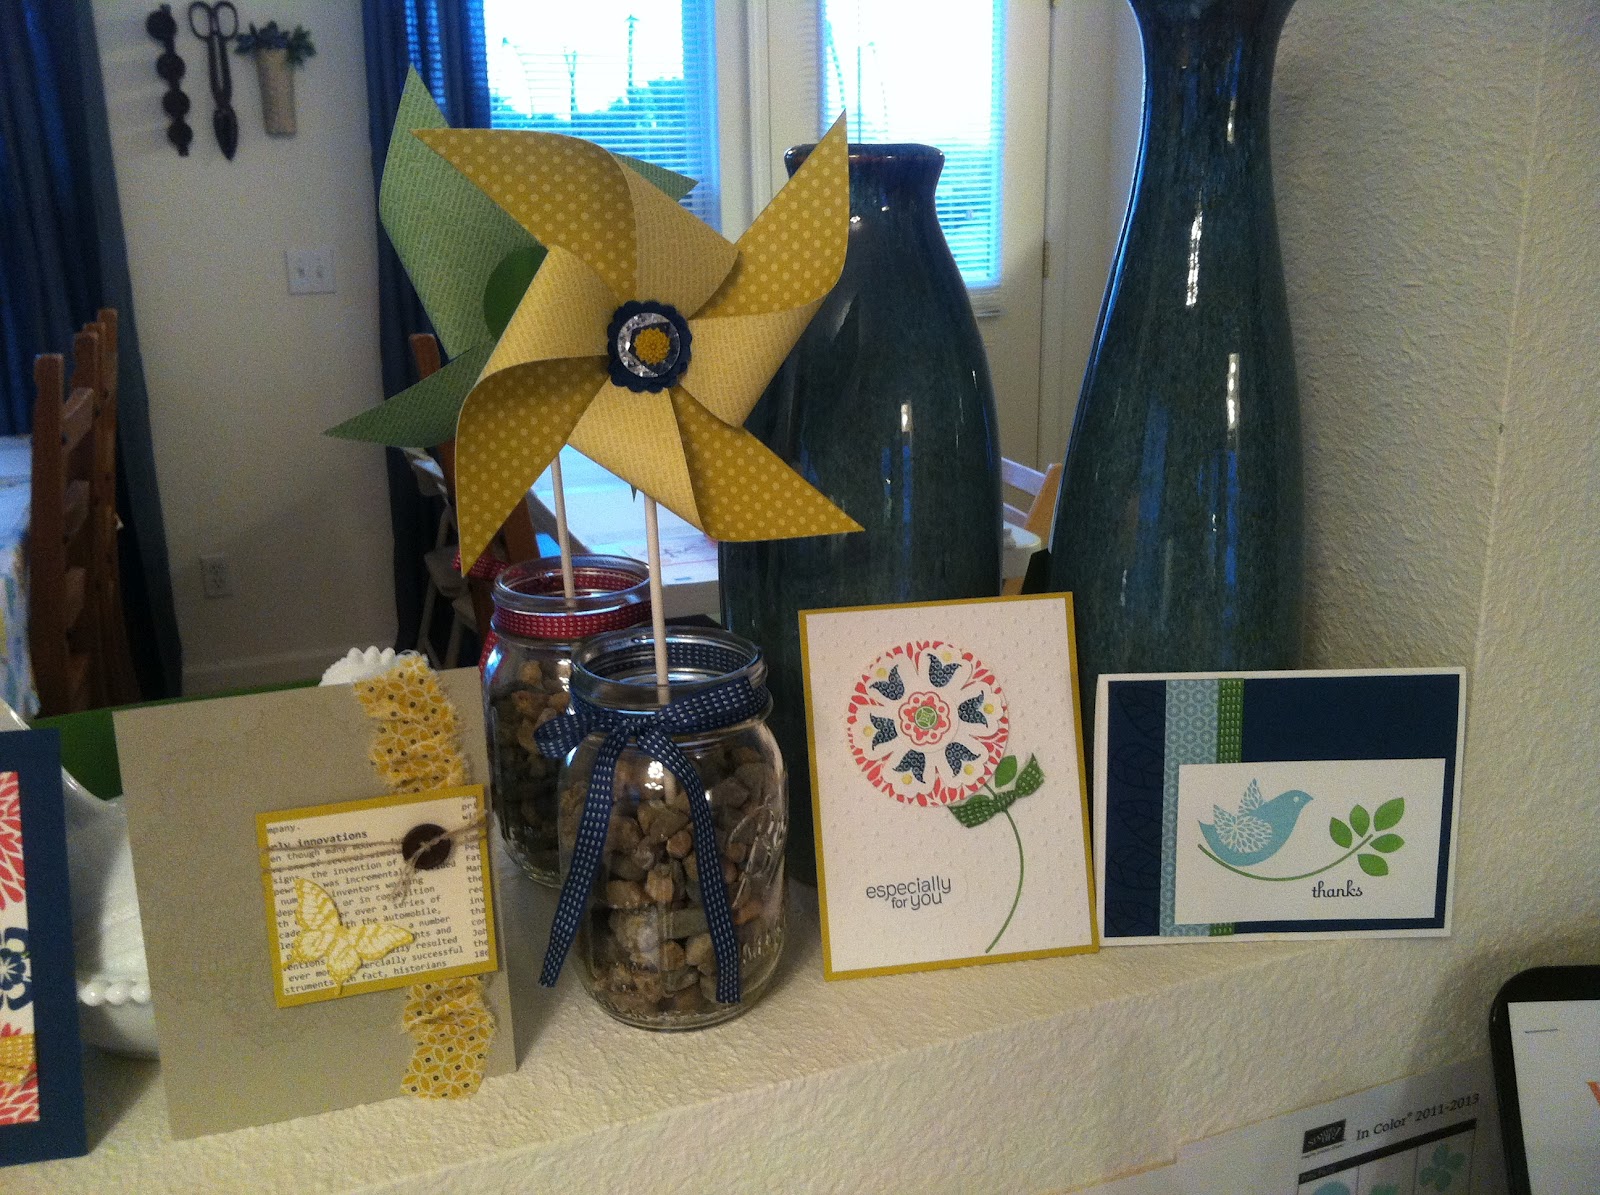
 The card and place settings are using all the same products as mentioned before except for a few extras. I used our Window Sheet and ran it through the Big Shot with the Woodgrain Embossing Folder then sanded it with out new Sanding Block. The Early Espresso Core'dination Card stock is also embossed with the Woodgrain Embossing Folder then sanded it for the cool two-tone effect. The Sentiment is from the Pursuit of Happiness Stamp Set - One of my favorite stamp sets of all time.

 I used Gratitude from the Fabulous Phrases inked in Lucky Limeade and then cut it out with the Bitty Banner Framelits. As shown in the background I also gave my customers to make blank one so they could write their guests names on them.
 It might have been hard to see in the previous pictures but there is such as fabulous shine to all of the projects as you can really see in this picture. Love the Champagne Shimmer Paint!!


I wish you all a Wonderfall Thanksgiving!

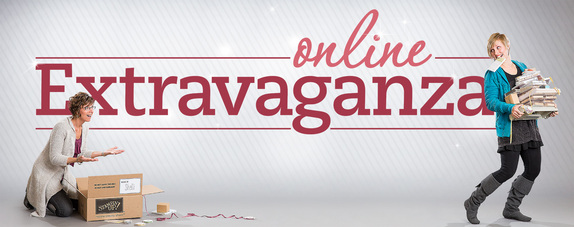
I hope you enjoyed my projects today. Please leave a comment. I would love to hear what you think! You can see all the products I used for these project in my Online Store and don't forget about the Online Extravaganza were you can save up to 50% on amazing products 

kimberly van diepen Stampin up demo

You can see ALL the products on sale HERE! Make sure to click on the items to see the sale price. The overview with all the items will only show the regular price. I'm so excited about this sale!
It's a fantastic opportunity to stock up on some great TOOLS and other product and pick up some creative elements at super prices! These will make great stocking stuffers for any crafter on your list or maybe, these will be your Christmas Gift to YOU! If you are one of my local customers you are welcome to place your order with me directly to save on shipping on orders under $69 - shipping is then only 10% instead of a $6.95 flat rate fee.
THINGS TO REMEMBER
  • Online Extravaganza goes until November 28th. Next Doorbuster 24 hour deals are on November 28th.  
  • Do you have the NEW Stampin' Up! App? Click HERE to download for the iPhone. 
  • Become a Demonstrator TODAY!  Fill YOUR kit with products of YOUR choice.  Receive a FREE set of Ink Pads.  Did you know that SALE items can be included in your PERSONALIZED kit? Yes it Can!  Now that's EXCITING! Visit my website and JOIN the EXCITEMENTNeed more information? I would love to talk to you one on one! EMAIL ME at Bente81@hotmail.com to set up a time.

Saturday, November 17, 2012

Stampin' Up! On-Line Extravaganza Starts Monday!

The Online Extravaganza during Thanksgiving week is Stampin' Up!'s biggest online sale of the year. With discounts up to 50% and 24-hour-only doorbusters, you won't want to miss it!

Stampin' Up! is making it easier than ever for you (or someone you love) to do your Christmas shopping. During these 10 days only, you can get incredible discounts-up to 50 percent-on some of your favorite products!
In addition, there will be three products 20 percent off for 24-hours only on both the first and last days of Online Extravaganza-our very own doorbusters!
Doorbusters for Monday, November 19 ONLY
  • Simply Scored™ Diagonal Plate (125586) $11.95 SALE $9.56
  • Big Shot™ Die-Cutting Machine (113439) $99.95 SALE $79.96 - This Awesome Tool has never been on sale before...Don't miss out on this one..you know you want one!
  • Big Shot Doctor’s Bag (113474) $69.95 SALE $55.96 
Doorbusters for Wednesday, November 28 ONLY
  • Clear Block Bundle: Blocks A-I (18491) $66.95 SALE $53.56 - this bundle price of regular $66.95 is already 15% off so you are saving even MORE!!!
  • Clear Block Storage Caddy (120279) $16.95 SALE $13.56
  • Stack & Store Caddy (109127) $34.95 SALE $27.96
ALL Nine Days, November 19-28th
There's more ... starting Monday, Nov 19th and ending Wednesday, Nov 28th, there is a huge list of additional items on sale starting with select Designer Series Papers at 20% off, Accessories at 25-40% off, and going all the way up to a huge selection of stamp sets and MDS 2+ for 50% off!!
 Made your list already??? Then you are ready to shop away on Monday, November 19th! 

and don't forget when you are shopping away on Monday in My ONLINE STORE to make sure you check out the Clearance Rack for even MORE savings!

Thursday, November 15, 2012

2 NEW Products!

AVAILABLE NOW!  Stampin' Up! is offering two exciting products!  Please leave me a comment at the end of this post with your thoughts on these two products!  I would love to get your feedback.

Texture Boutique Embossing Machine--test product

Give the gift of texture. The Texture Boutique works with our Textured Impressions Embossing Folders to transform ordinary cardstock, paper, metallic foil, or vellum into an embossed, textured masterpiece. This machine embosses only; it does not die cut.  Stampin' Up! has 4,000 available to be sold only while supplies last. If this product test goes well, Stampin' Up! may offer the Texture Boutique again in the future.  Purchase just the Texture Boutique Embossing Machine (item 132657) for $29.95.

 
HOW ABOUT A SPECIAL PRICE WHEN YOU BUY BOTH?
To help you with your gift-giving needs, Stampin' Up! is offering a special Texture Boutique Bundle (item 132700) that includes the Texture Boutique Embossing Machine and the Flower Garden and Stripes Textured Impressions Embossing Folders for $39.95 (a $45.85 value).

Talking Tag - new product

Give the gift of sound. Handcrafted projects show loved ones how much you care--let your voice tell them too! With Talking Tag, you can record your own personal message that recipients can access by scanning the Talking Tag. Attach them to cards, invitations, gift tags, business cards, catalogs, scrapbook pages, wine bottles . . . well, anything!
Buy 'em by the sheet! You get 10 tags for $7.95 (item 129723). 


Wednesday, October 17, 2012

Folded Christmas Tree Card Video


 I was browsing Stampin' Up!'s videos on You Tube the other day and came across this one I wanted to share. It shows you how to make the cute accordion fold Christmas Tree card on page 181 in the Annual Catalog. After I watched it I couldn't believe how easy it actually was...it looks so complicated in the picture!


I hope you enjoyed it - now I definately have to try and make my own version. Remember to check out more of Stampin' Up!'s videos - HERE is the link to Stampin' Up!'s channel on You Tube.

If you need any of the supplies used in the video, just visit my Online Store or contact me for more info.

Tuesday, October 16, 2012

Fall has Fallen!

I recently held a class dedicated just to Fall. We made 3 cards with a Fall theme and a fun gift pouch as well.

First card from the left uses the new Friendship Preserves together with the coordinating Window Frames Framelits and the Festive Paper Piercing Pack. You can get the Festive Paper Piercing Pack FREE this month - see HERE for more details.

Second card from the left uses the Perfectly Preserved stampset and coordination Framelits - don't you just love that you can save 15% when you buy both! I also used the coordinating Orchard Harvest Designer Series Paper. I have seen several cards where the jar has been stamped with Black Staz'on ink on the Windows Sheets for a fun "life like" glass effect and could wait to try it out. It is impossible to see in my picture but I created a basket weave effect on my Island Indigo strip by running it through the Stripes Embossing Folder by flipping the card stock over and lining up diagonal from one corner to the opposite.

Third card from the left is made using the French Foliage Stamp set with the Triple Time Technique. So much fun and so easy. Here are the dimensions for the layers in case you would like to try this out for yourself.
Very Vanilla Cardstock: 2" x 3 1/4", 3" x 4 1/4", 4" x 5 1/4"
Cajun Craze Cardstock: 2 1/4" x 3 1/2", 3 1/4" x 4 1/2", 4 1/4" x 5 1/2"
You layer all the vanilla pieces on top of each other - maybe stick them together with a Glue Dots or adhesive from the Tape Runner so they stay in place while you stamp. You want to be able to take them apart again after you are done stamping so avoid any adhesive that is too sticky.

The pouch was inspired by one I saw on Dawn Olchefske blog and I loved it so much that I changed it very little - she also has an example of a Hot Cocoa pouch I can't wait to try -  see Here - however what I really want to change it in to is ...being in the Cornhusker state and all ..is a Popcorn pouch... I am planning on making those for my kids teachers. The Perfectly Preserved stamp set has a corncob and the Orchard Harvest Designer Series Paper has a pattern with them too...I will try to post pictures of those when I get them done. The ribbon used it is the new 7/8" Cotton Ribbon ...so soft ....and I stamped the apples from the Perfectly Preserved Stamp Set right on top...so much FUN ..love you can do that!


I hope you enjoyed today's projects. Please leave me a comment and let me know what you think.

Monday, October 15, 2012

Christmas Gift with Purchase

It's only October, but Stampin' Claus is coming to town! Get a FREE Festive Paper-Piercing Pack when you purchase the Ornament Keepsakes Set (or Ornament Keepsakes Bundle, which includes the coordinating Framelits) AND Candlelight Christmas Specialty Designer Series Paper.


BUY
Candlelight Christmas Specialty Paper
 

AND
Ornament Keepsakes Stamp Set
OR
Ornament Keepsakes Bundle
you will get...
Festive Paper Piercing Pack
FREE!
Be sure to use the numbers below when ordering to take advantage of this great promotion! 
Item
Description
Retail Value
Special Price
132260
Christmas Gift Pack (wood-mount)
Includes Ornament Keepsakes Set (wood-mount), Candlelight Christmas Specialty Designer Series Paper, Festive Paper-Piercing Pack
$55.85
$47.90
132261 Christmas Gift Pack (clear-mount)
Includes Ornament Keepsakes Set (clear-mount), Candlelight Christmas Specialty Designer Series Paper, Festive Paper-Piercing Pack
$44.85
$38.90
132262 Christmas Gift Pack (wood-mount bundle with Framelits)
Includes Ornament Keepsakes Bundle (wood-mount), Candlelight Christmas Specialty Designer Series Paper, and Festive Paper-Piercing Pack
$70.85
$62.90
132263 Christmas Gift Pack (clear-mount bundle with Framelits)
Includes Ornament Keepsakes Bundle (clear-mount), Candlelight Christmas Specialty Designer Series Paper, and Festive Paper-Piercing Pack
$63.85
$55.90

Don't miss out the Promotion Ends October 31, 2012


Saturday, October 13, 2012

Ornaments for my Halloweeen Tree

I got two amazing Halloween trees last year. However due to space issues in my new home I only have room for one, which is probably ok since I hardly have any ornaments to hang on it yet. I have been seeing this cool vintage looking and very expensive ornaments on Etsy but I just refuse to spend that much money when I know I can make some of my own even though they might not be vintage.

Here is one of my Halloween Trees. As you can tell it looks pretty bare. I will have to make some more when I get a chance. By the way sorry for the bad pictures - the light from the windows make them look all dark.
The first one! I actually made this one using scraps I had laying around from when I made my Halloween Rosette...all the same supplies plus a few extras including one of those amazing Vintage Faceted Designer Buttons...see I managed to put my own vintage spin on them ha! I should mention the the string the ornaments are hanging from is actually White Baker's Twine that I dyed with a ink refill...what a mess I had black fingers for days...

 Here is the second one...it also uses some scraps I had laying around but I added a scallop circle punched out of the the silver Glimmer paper. I used my papersnips and cut in each scallop and lightly bent them up  for more dimension then I added a big Basic Black button and a Large Pearl Basic Jewel for the center. I didn't want my tulle - which by the way again is Crumb Cake that has been inked with the Staz'on Black Ink - to have the scalloped edge that the Tulle original comes with so I snipped  the edge till I liked the way it looked.
 My Boo Ornament I actually made using Orchard harvest Designer Series Paper instead of the Howlstooth & Scaringbone Designer Series Paper. I wanted my edge of the rosette to have points just like the one in the Designer Rosette Bigz XL die but because the folds there are at every 1/2" I cut each point using my papersnips. The little spiderweb is from Spooky Bingo Bit and the Boo! from Tiny Tags stamp sets. Black 3/8" Taffeta Ribbon makes a super fun layer between the rosette and scalloped circle.
 My last ornament is actually using a technique that was showcase in last year's Holiday catalog. The cones are made by punching our squares of paper then rolled and glued in to cones...messy I had to wash hand several times...but the end result is so worth it. The Spooky is from the Border Banter Stamp Set and attached with a 3/8" Basic Black Glimmer brad on top of a snippet of Silver Glimmer Paper punched out with one of the punches in the Little Labels Punch Pack.
 As you can tell I love all that glitters...I can't wait to fill my tree up with more creations. I hope to make some each year to add to my collection.

Please let me know what you think by leaving a comment below... I appreciate you stopping by! For a complete list of all products used see below.


Supplies:
Paper: Houndstooth and Scarringbone and Orchard Harvest Designer Series Paper, First Edition Specialty Designer Series Paper, Tangerine Tango, Very Vanilla and Basic Black Cardstock, Silver Glimmer Paper
Stamp set: Tiny Tags, Border Banter, Toxic Treats
Tools: Simply Scored Scoring Tool, 1 3/4" and 1" Circle punches, 1 1/4" Square Punch, Little Labels Punch Pack, 1 1/4" Scallop Circle Punch
Ink: Staz'on Black Ink and refill
Adhesive: Tombo Multi Glue, Sticky Strip, Jumbo Sticky Rounds, Glue Dots, Dimensionals
Embellishments: Silver Glass Glitter, Glimmer brads, Crumb Cake 3 1/2" Scalloped Tulle Ribbon, 3/8" Basic Black Taffeta Ribbon, 1/2" Very Vanilla Seam binding Ribbon, White Baker's Twine, Basic Jewels Rhinestones, Vintage Faceted Designer Buttons, Neutrals Designer Buttons, Basic Glimmer Brads, Large Pearl Basic Jewels

Friday, October 12, 2012

NEW Stampin' Up! Single Stamps for Sale for a Limited Time!


 Stampin-Up-Single-Stamps


 Have you ever wanted just one or two stamps from a larger set?  Stampin' Up! is trying out something new! You can now buy single pieces from these select Stampin' Up! stamp sets: Word Play, Perfectly Penned, and Seasonal Sayings. The offer will be available now through January 2, 2013.

Flyers
Single Stamps: Word Play
Single Stamps: Perfectly Penned
Single Stamps: Seasonal Sayings
Details
  • You can find the single stamp item numbers on the flyers.
  • Important:  These single stamps won't be sent to you in the Stampin' Up! typical cases or packaging; they'll be packaged in cello bags. If you'd like a case for your stamp, you can buy our Clear-Mount Stamp Cases that come in packs of four (item 119105).
  • This offer is available for clear-mount stamps only.
  • The stamps won't come with a Clear-Mount Block, and you'll need to buy a block separately if you don't already have one. The recommended block sizes can be found on the flyers. 
  • There's no limit on how many pieces you can buy.
  • Remember that this is a pilot program, so take advantage of it while you can!

Thursday, October 11, 2012

Halloween Rosette

I recently had my Halloween Class and this was one of the projects we made. It is sooo beautiful in real life and so hard to capture on camera. I hope you'll enjoy the pictures and maybe give it a go on making your own.

The Simply Scored tool is a must when you make rosettes like this. All the pleats are scored at 1/4". The Howlstooth and Scaringbone Designer Series Paper is cut in to 2 strips 3" x 12" each and attached to a 3 1/2" circle of cardstock with the Jumbo Sticky Rounds. I didn't worry that there was a gap in the center of the rosette since it was going to be covered up anyway. On top of the Designer Series Paper is a piece of the Crumb Cake Tulle folded in half and pleated using sticky strip to attach it. As you probably can tell the tulle doesn't look like crumb cake at all and it is because I changed the color by inking it up with the Black Staz'on ink pad on each side - so cool right? The Tulle ribbon does come in Early Espresso also but I wanted something more true to black, so I had to improvise.
Here is a close up! The First Edition Specialty Designer Series Paper Rosette's edge got some Tombo Glue scraped on to the edge then rolled in Silver Glass Glitter that will tarnish with time for a more vintage look. See the shimmer all over the rosette! I made my own Smooch Spritz using the Champagne Mist Shimmer Paint mixed with 70% rubbing alcohol in our Stampin' Spritzer because I use so much of it. You can also buy the Smooch Spritz we have which is all premade for you to use.
 See all the layers...sigh ...Love it!
Please let me know what you think about today's project by leaving a comment! Remember you can also subscribe to my blog to get all the lastest post directly to your inbox...see box to the right!
 Supplies:
Paper: Houndstooth and Scarringbone Designer Series Paper, First Edition Specialty Designer Series Paper, Tangerine Tango and Basic Black Cardstock, 
Tools: 3 1/2" Circle Originals Die, Spider Web Embossing Folder, Typeset Alphabet Bigz die, Big Shot, Stampin' Sponges, Simply Scored Scoring Tool, 2 1/2" Circle punch
Ink: Staz'on Black Ink, 
Adhesive: Tombo Multi Glue, Sticky Strip, Jumbo Sticky Rounds, Glue Dots, Dimensionals
Embellishments: Silver Glass Glitter, Antique brads, Champagne Shimmer Paint, Stampin' Spritzer, Crumb Cake 3 1/2" Scalloped Tulle Ribbon, 3/8" Basic Black Taffeta Ribbon, 1/2" Very Vanilla Seam binding Ribbon
Other (non Stampin' Up!) Candy Lollipop stick, rubbing alcohol

Friday, September 21, 2012

Happy Birthday - the Freshly Made Sketches way!

Here is a card I made for a dear friend's birthday using her favorite color green and a sketch from Freshly Made Sketches weekly challenge
It is a bold combination of Melon Mambo, Lucky Limeade and Gumball Green but it would be so easy to change to any color combo and give you a chance to use some of all of those scraps that I am sure you have laying around. Personally I can't wait to make a Christmas Card using this sketch and the brand new Festival of Prints Designer Series Paper Stack with the Greetings of the Season stamp set...but that is a card for another post

 Here is the original sketch
My finished card size is 4 1/4" x 4 1/4" - so it can still easily fit in to a regular size envelop. For my background strips I used the Gumball Green Core'dination Cardstock embossed with the Lacy Brocade Embossing folder and the Big Shot. The cardstock is then sanded with the Stampin' Sanding Block and all the fuzz is wiped off with the Core'dination Dust Buddy. I love how the sanded parts of the Core'dination cardstock matches the Lucky Limeade background. The Melon Mambo strips are from the Floral District Designer Series Paper pack. My strips are all glued down "not exactly straight" as I wanted to break up all the straight lines I had going on on this card.My friend is also a big fan of polkadots so of course I had to add a little snippet of the Melon Mambo Scalloped Polka dotted ribbon for added texture.

My Happy Birthday from the You're Amazing stamp set is colored in with markers then cut out with the Apothecary Accents Framelits. For added interest I used the coordinating Essentials Paper-Piercing Pack to add the pierced frame and what card for a girlfriend doesn't need a little bling in the shape of two big Rhinestones..

I hope you enjoyed today's card please leave a comment and let me know what you think ...and if you can I invite you to play along on the sketch challenge. It is so much fun and help me think outside the box...eh ...card square if you know what I mean.. Happy Stampin'!

Thursday, September 20, 2012

Mini Thanks Yous

I created a bunch of these Mini Thank Yous for the customers who place an order at my Open House last week.

The card base is Whisper White 3" x 3" and has a square of fun Floral District Designer Series Paper on top. I used my Layered Labels Stamp Set stamping Create first in Gumball Green Ink and then again in Rose Red Ink. The Gumball Green Ink piece was cut out using the Apothecary Accents Framelits and a piece of Daffodil Delight 1/4" Stitched Grosgrain Ribbon was attached to the back with Glue Dots. I used my 1" Circle Punch to punch out the Rose Red Create. The circle is attached with a Dimensional on top as well as Dimensionals behind the Gumball Green piece.

This was such a super easy card and you can use the same idea using punches instead of Framelits to layer pieces on top of each other. I have been eying the Quint-Essential Flower Single Stamp on page 110 in the Annual Catalog for that same reason. It shows you on the bottom of that page how to use your punches to create all the layers and dimensions. If you have this stamp, let me know what you think of it...I would love to hear!

Wednesday, September 19, 2012

Open House

It has been crazy, crazy here. Since last post I have been sick a couple of times...trying to deal with everything as usually and most importantly busy stamping and preparing for my Open House that I held last week, so I am so sorry my blogging slipped a bit.

Here are some pictures of my Open House set up...please excuse the poor lightning in the pictures...not great light in my new house to begin with..

As people arrived they received a Information Packet and got to choose a small thank you gift for coming. Each of these little boxes had a small Hershey Chocolate candy bar inside.

To the left of the entryway I had set up a table with all the New Holiday Catalog product. I had made a bunch of samples to look at with all my new goodies though I had hoped to have more done...
You can't do an Open House without door prizes.. and of course a Grand Prize ..The Christmas Deer Stamp Set and a spool of the Cherry Cobbler Polka dotted ribbon!
I had lots and lots of displays


and to showcase September's Back to Spool Promotion I had made Pinwheels in all the 2012-2014 In Colors stuck in Mason jars...

 I also had a Sign up Table for classes and Stamp Club and my Ribbon Share...
Here are my Halloween Class projects coming up next week on the 27th! 5 projects for $15 - still has 1 spot left for this class...it is going to be FUN!
and here is the projects I did for my Stampin' 101 Class. A class that teaches 3 basic stampin' techiques ...Stampin' with Marvelous Markers, Rock n' Roll/Stampin' Down and Blender Pens...I just held that Tuesday night and it was a great success.
 Of course you can't have an Open House without Make n' takes - I had prepared 2 different cards.

A Halloween card showcasing the Googly Ghouls Stamp Set, Howlstooth & Scaringbone Designer Series Paper and the Googlies eyes.
 The second card showcases the Scentsational Season Stamp Set, The Snow Festival Designer Series Paper together with September's Back to Spool Promotion.
For each Make n' Take I had written up a Card Recipe so guests could easily figure out how to do the cards.

I think the Open House was a big success. I wasn't sure what to except as I am still new here and don't know a lot of people yet... but I had a decent turn out for my first event plus people really seem to like the classes I am offering so far. I am still trying to start up a Stamp Club so if anyone in the Bellevue/Omaha area like to stamp send me an email and I can tell you much more about it.

Hope you got inspired by all my pictures.

Happy Stampin'!

Bente

Thursday, September 6, 2012

Googly Ghouls Witch

I am busy preparing for my Open House next Wednesday but wanted to make sure you get your weekly dose of new inspiration. Here is a another quick card I made with the Googly Ghouls stamp set to showcase some of the other images.
The witch is stamped in Rich Razzleberry classic ink on Whisper White card stock. I colored in her buttons and hat with Pumpkin Pie and Old Olive Many Marvelous Markers. Two Googlies (50 for $2.50...so affordable!) are added to her eyes - so fun and make her come to life! She is punched out with the 2 1/2" Circle Punch and who knew that the largest scallop circle from the Perfect Pennants Bigz L Die fit perfectly behind it. Finishing touch is a small bow attached with a Glue Dot using the Basic Black 1/8" Taffeta Ribbon.
The banner behind is made using 2 different Designer Series Packs; Polka Dot Parade - one of my absolute favorites from the Annual Catalog and Howlstooth & Scaringbone - one of my new favorites from the Holiday Catalog.

I hope you've enjoyed today's card? Please leave me a comment and let me know what you think! I hope to be back with more tomorrow ...maybe a sneak peak from one of my classes later this month?...we'll see.... To view my complete class schedule for September click HERE and don't forget September's awesome promotion, get a FREE spool of the 3/8" Stitched Satin In Color Ribbon with a $40 order - a great time to stock up for all your Holiday Projects.

Wednesday, September 5, 2012

Check out the Clearance Rack...

If you have started to think about your Halloween or other Holiday projects but not sure if you can do it all and stick to your budget then check out the Clearance Rack in my Online Store. There are lots of fun accessories and supplies for less - up to 60% off original prices....like these examples below..

Like this Wicked Fun Designer Series Paper for only $4.79
 

or how about this Bat Punch for only $9.59

or this very cool Autumn Spice 8" x 8" scrapbook album for just $5.99


Autumn Spice 8x8 Album
I am sure you will find lots of great deals for all your Holiday crafting needs. Remember these deals are only while supplies lasts and only available online, so don't delay....shop now...and don't forget if you spend $40 (before s/h and tax) you even get a FREE spool of the 5/8" Satin Stitched Ribbon - see HERE for more info on that.

Happy Shopping!